Table of Contents
ESP32 with SSD1306 oLED display libraries
There's a lot of articles out there already on using these little 128×64 oLED monochrome displays with an ESP32 or with an Arduino board. However with setting up, I had to find my own way around several quirks so it's worth jotting them down here.
I've used the Arduino IDE and hence, the Arduino libraries for ESP32 for this article.
The go-to library for working with oLED displays appears to be Adafruit's SSD1306 library judging by the amount of articles written on it. This one is packed with features while being easy to use (but there are others!).
At first this was going to be a dive into the I2C protocol which is one of the communication methods for these displays. However Adafruit's library (and others) abstract so much away for you that you're left without needing to know much at all about it aside from how to wire it up.
Perhaps it's worth starting from there.
On an ESP32 30 pin board, the SDA pin is usually on 21 and the SCL pin is usually 22. Hook these to the display's pins, as well as the 3.3V and GND pins, like so:
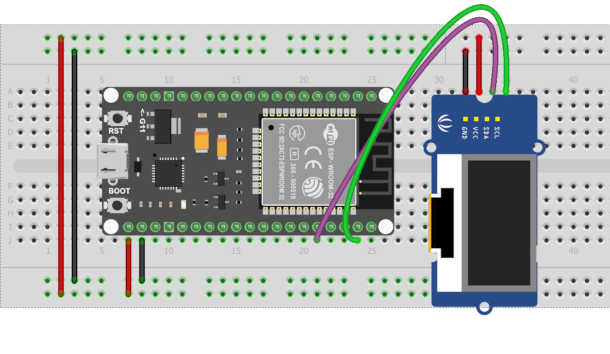
No need for any pull-up resistors for the I2C pins as these are already internal on the ESP32.
Adafruit's SSD1306 Library - valid September 2020
To add this library, go to the Library Manager of the Arduino IDE. Select Adafruit's SSD1306. At the time of writing, the library has since been broken up. So you will need to also add the following two libraries:
- Adafruit GFX Library
- Adafruit BusIO
You may have noticed from other articles that parts of the Adafruit library had to be changed to suit Chinese sourced boards. This is no longer the case. Also, only a single include is required for your sketches to work with this display.
The examples that are provided with the library do require you to change your display board address. Adafruit's part id is 0x3D. For Chinese sourced boards, the address is usually 0x3C.
To further complicate matters, many of these boards will indicate an address underneath of usually 0x78 or 0x7A. They are both I2C address so what gives? Turns out 0x78 is the 8-bit address: 01111000 and 0x3c is the 7-bit address: 0111100. But there is an easier way to think about it. If your I2C address on your board is 0x78, halve this value and you get: 0x3C. That will be the address to use (the 7-bit one).
If 0x3C turns out not to work for you, you can use this little sketch to search for the display board's address:
#include <Adafruit_I2CDevice.h>

void setup() {
  while (!Serial){
    delay(10);
  }
  Serial.begin(115200);
  Serial.println("I2C address detection test");

  int id = 1;
  Adafruit_I2CDevice i2c_dev = Adafruit_I2CDevice(id);

  while(1){
    if (!i2c_dev.begin()) {
      Serial.print("No device found at 0x");
      Serial.println(i2c_dev.address(), HEX);
    } else {
      Serial.print("Your device is on address 0x");
      Serial.println(i2c_dev.address(), HEX);
    }

    delay(400);
    id++;
    i2c_dev = Adafruit_I2CDevice(id);
  }
}

void loop() {
}
The code above uses the Adafruit_I2CDevice.h header from the Adafruit BusIO library, and simply cycles through trying each address until a device is found.
The serial console output will be something like this:
18:48:49.362 -> No device found at 0x3A
18:48:49.784 -> No device found at 0x3B
18:48:50.159 -> Your device is on address 0x3C
18:48:50.581 -> No device found at 0x3D
18:48:50.956 -> No device found at 0x3E
If no device is found:
- Check you have SCL and SDA connected between the ESP32 and the display, and they're the right way around.
- Ensure you have the 3.3V and GND connected between the ESP32 and the display.
- Ensure you have voltage out of 3.3V
- Ensure that you have the correct pin numbers chosen for SDA and SCL on your particular ESP32, as they can vary.
If the above is all checked and you have a device found, take note of the address number (probably 0x3C).
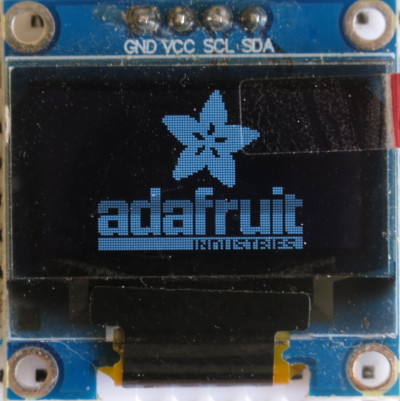
Let's try a simple program to display the default splash screen:
#include <Adafruit_SSD1306.h>

#define SCREEN_WIDTH 128
#define SCREEN_HEIGHT 64
#define OLED_RESET    -1 //no reset pin

Adafruit_SSD1306 display(SCREEN_WIDTH, SCREEN_HEIGHT, &Wire, OLED_RESET);

void setup() {
  bool init_success = display.begin(SSD1306_SWITCHCAPVCC, 0x3C); //0x3C for clone SSD1306. 0x3D for Adafruit's version.
  while (!init_success){
    //Stay forever. Could blank an error led slowly here, and serial error message out.
  }

  display.display();
}

void loop() {
}
I'll talk through each line above. First, we include a single header file which will provide the Adafruit SSD1306 library function. In turn, this library makes available the GFX and BusIO libraries for you.
The screen width and height in pixels are defined. The library will use these values to ensure the ESP32 communicates with the correct display type. The oLED reset pin is defined too.
These parameters are then passed to the display.
Next, the display is initialised with the begin function, and SSD1306_SWITCHCAPVCC is passed to let the library know the voltage will come from the voltage pin on the ESP32. An external voltage is also possible.
The second parameter here is your display board address that you took note of earlier. You did, didn't you?
If success is true, the display is ready to go, has allocated ram, and power and can start taking commands.
Finally, display.display() writes the RAM contents to the screen. This function is what you would call after you finish calling all your draw routines.
If that worked out all nicely for you, let's try a random dotty effect:
#include <Adafruit_SSD1306.h>

#define SCREEN_WIDTH 128
#define SCREEN_HEIGHT 64
#define OLED_RESET    -1 //no reset pin

Adafruit_SSD1306 display(SCREEN_WIDTH, SCREEN_HEIGHT, &Wire, OLED_RESET);

void paintDots(){
    int repeat;

	for (repeat=0; repeat<5000; repeat++){
	  display.drawPixel(random(SCREEN_WIDTH), random(SCREEN_HEIGHT), SSD1306_WHITE);
	  display.drawPixel(random(SCREEN_WIDTH), random(SCREEN_HEIGHT), SSD1306_BLACK);
    }
    display.display();
}

void setup() {
  bool init_success = display.begin(SSD1306_SWITCHCAPVCC, 0x3C); //0x3C for clone SSD1306. 0x3D for Adafruit's version.
  while (!init_success){
    //Stay forever. Could blank an error led slowly here, and serial error message out.
  }

  display.clearDisplay();
}

void loop() {
  paintDots();
}

Similar overall structure but now, each time paintDots() is called, 5000 black dots are painted, then 5000 white dots are painted. This gives to effect of animated snowy noise.
This library gives you the ability to paint pixels, lines (horizontal and vertical), scroll sections of the display, dimming, clearing etc.
The GFX library gives you a whole lot more.
The following program creates a pixel as per before, but now it uses text and a rectangle from the GFX library. You still only need to include the same SSD1306 library:
#include <Adafruit_SSD1306.h>

#define SCREEN_WIDTH 128
#define SCREEN_HEIGHT 64
#define OLED_RESET    -1 //no reset pin

Adafruit_SSD1306 display(SCREEN_WIDTH, SCREEN_HEIGHT, &Wire, OLED_RESET);

void setup() {

  bool init_success = display.begin(SSD1306_SWITCHCAPVCC, 0x3C); //0x3C for clone SSD1306. 0x3D for Adafruit's version.
  while (!init_success){
    //Stay forever. Could blank an error led slowly here, and serial error message out.
  }

  display.clearDisplay();
  display.drawRect(0, 0, 30, 20, SSD1306_WHITE);
  display.drawPixel(15, 10, SSD1306_WHITE);

  display.setTextColor(SSD1306_WHITE);

  display.setTextSize(1); //set 6x8 font size
  display.setCursor(36, 0);
  display.println("Hello");

  display.setTextSize(2); //set 12x16 font size
  display.setCursor(36, 18);
  display.println("Hello");

  display.setTextSize(3); //set 18x24 font size
  display.setCursor(36, 39);
  display.println("Hello");

  display.display();

}

void loop(){
}
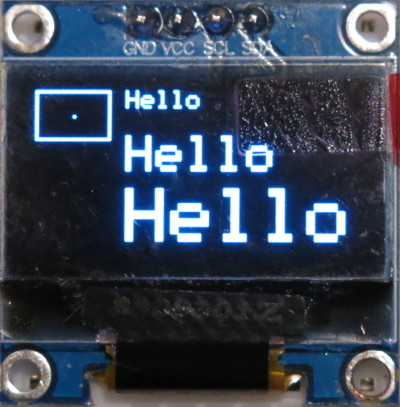
Worth noting that when using println, the text will nicely wrap. A good feature.
So that's the Adafruit library. Got to give them a plug for the effort they have made with this library.
The Acrobotic SSD1306 Library
An alternative library is the one from Acrobotic. You can install the library though the Library Manager. This library is able to write text (some fonts included), and draw bitmaps. It can also scroll. There are no drawing routines at the time of writing.
Here's a small test program:
#include <ACROBOTIC_SSD1306.h>

void setup()
{
  Wire.begin();
  oled.init();                      // Initialise SSD1306
  oled.clearDisplay();
  oled.setTextXY(0,0);              // Set cursor position, to pixel 0,0
  oled.putString("ACROBOTIC will wrap with long text. A long long song, so goodbye thing you sing too long. And perhaps just a little more to get to the bottom.");
}

void loop(){
}

The above program can wrap text on the display. Also, interestingly, no screen size is required. I don't have a 128×32 display to test, but looking at the github site, I an guessing the library assumes 128×64 displays.
The repo for this library is at: https://github.com/acrobotic/Ai_Ardulib_SSD1306
Their tutorial is at: https://acrobotic.com/blogs/learning/esp8266-using-i2c-oled-screens-ssd1306
ThingPulse Library
Another full featured library is available from ThingPulse. This one supports drawing pixels and shapes, lines, progress bars, bitmaps, text with alignment, screen flipping, and a stack of other features.
Here is a quick example:
#include "SSD1306Wire.h"

SSD1306Wire display(0x3c, SDA, SCL);

void setup() {
  display.init();

  display.fillRect(0, 0, 40, 20);
  display.fillCircle(60, 10, 10);

  display.setFont(ArialMT_Plain_16);
  display.setTextAlignment(TEXT_ALIGN_RIGHT);
  display.drawString(128, 33, "Right aligned.");

  display.flipScreenVertically ();
  display.display();
}

void loop(){
}

The repo and introduction for the library is here: https://github.com/ThingPulse/esp8266-oled-ssd1306
ThingPulse put considerable effort into providing this library. Their products can be found at: https://thingpulse.com/shop/
Others
There's a few others available in the Library Manager. Just search for 1306. There's a couple of simple libraries and some quite heavy featured ones for multiple display types.

Credits
Thanks to the following site for their info and heads up on potential issues: https://lastminuteengineers.com/oled-display-esp32-tutorial/