Table of Contents
Deploying an open, insecure .NET Core WebAPI to a Plesk host
 If you don't have an account with the likes of the Azure or AWS, but you have your own Windows-based hosting, and you'd like to deploy your own .NET Core WebAPI, it's likely to be quite possible. Even if the host doesn't officially support your version of .NET.
At the very least, the process to test it should be fairly straight forward. And I'll provide some troubleshooting along the way in case problems are encountered.
In my test case, I'll be using a small Plesk-based host that has:
- Only support up to .NET 4.72 (no .NET Core, that's OK we'll overcome this later)
- Is IIS based
- Allows for subdomains
Many non-Plesk web hosts should also work fine too.
My resources for this test:
- Visual Studio 2019/2022
- A small demo WebAPI (of course)
Plan of attack
We'll do this in several parts:
- Create a very small WebAPI.
- Publish the files locally.
- Create a subdomain on your remote web host.
- Copy the files to this new subdomain.
- Browse to it to test.
Creating the API
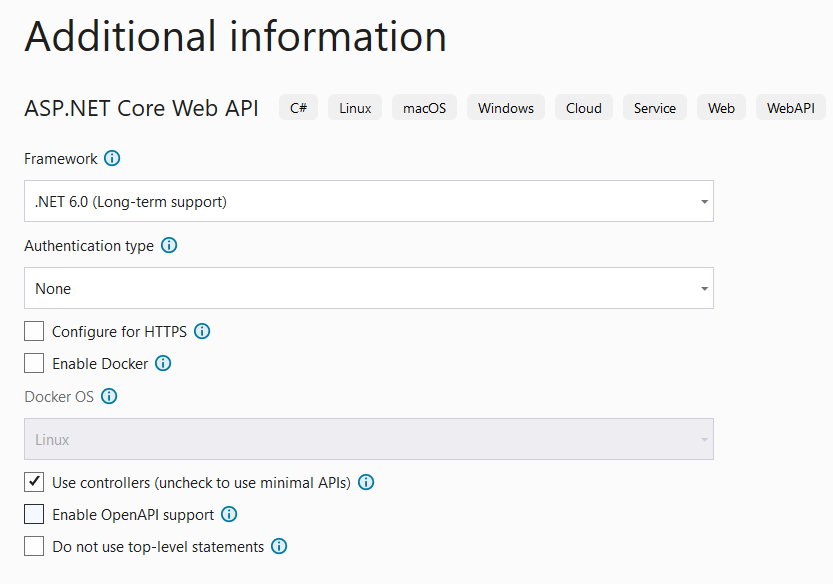
We'll make an API that returns some JSON describing details of some great retro games. Start by opening Visual Studio 2019 or 2022.
- Create a new project
- Pick ASP.NET Core Web API for C# and Windows
- Call the Project: RetroGamesAPI
- Place the solution and project in the same directory
- Choose .NET Core 6.0 (Long-term support) so that this article doesn't have to chase the latest and greatest. Feel free to try higher versions, but is untested with this article.
- No Authentication
- Don't configure for HTTPS
- No Docker
- Use controllers
- No OpenAPI support
Now that the project has been created, delete the following default files created for us:
- Controllers/WeatherForecastController.cs
- WeatherForecast.cs
Let's create our own new model class file Game.cs to represent the data for an individual game/record/model/instance:
namespace RetroGamesApi
{
    public class Game
    {
        public int GameId{ get; set; }
        public string Title { get; set; }
        public int Year { get; set; }
    }
Next, create a new empty API Controller for handing out a list of games, called RetroGamesController.cs:
using Microsoft.AspNetCore.Mvc;

namespace RetroGamesApi.Controllers
{
    [Route("api")]
    [ApiController]
    public class RetroGamesController : ControllerBase
    {
        [HttpGet]
        [Route("games")]
        public IEnumerable<Game> Get()
        {
            List<Game> games = new List<Game>();
            games.Add(new Game {
                GameId = 1,
                Title = "The Secret Of Monkey Island",
                Year = 1990
            });
            games.Add(new Game
            {
                GameId = 2,
                Title = "Half Life 2",
                Year = 2004
            });
            games.Add(new Game
            {
                GameId = 3,
                Title = "Commander Blood",
                Year = 1994
            });

            return games;

        }
    }
}
In Properties/launchSettings.json, change all instances of the default weatherforecast to api/games:
Compile and run, and you should get something serving out at https://localhost:44346/api/games and showing some JSON output with your API data:
[
    {
      "gameId": 1,
      "title": "The Secret Of Monkey Island",
      "year": 1990
    },
	{
      "gameId": 2,
      "title": "Half Life 2",
      "year": 2004
    },
    {
      "gameId": 3,
      "title": "Commander Blood",
      "year": 1994
    },
]
Publishing your API locally
Great, so we have our API code all ready and it's working. We need to publish the files so that we have something suitable to copy to our web host.
Select Build > Publish RetroGamesAPI.
A dialogue will prompt you as to what sort of publishing you are doing. Choose the Folder option as we just want to create our files locally. Stick with defaults and click Finish. Close the dialogue.
Click the Show all settings link so that we can tweak the settings which will make our build suitable for our web host.
We need the Self-contained mode, as we can't rely on .NET Core being available on the host. Target win-x64, and we want to produce a single file, rather than have many little DLLs. That would be a tedious thing to upload. Click Save to save the publish profile.
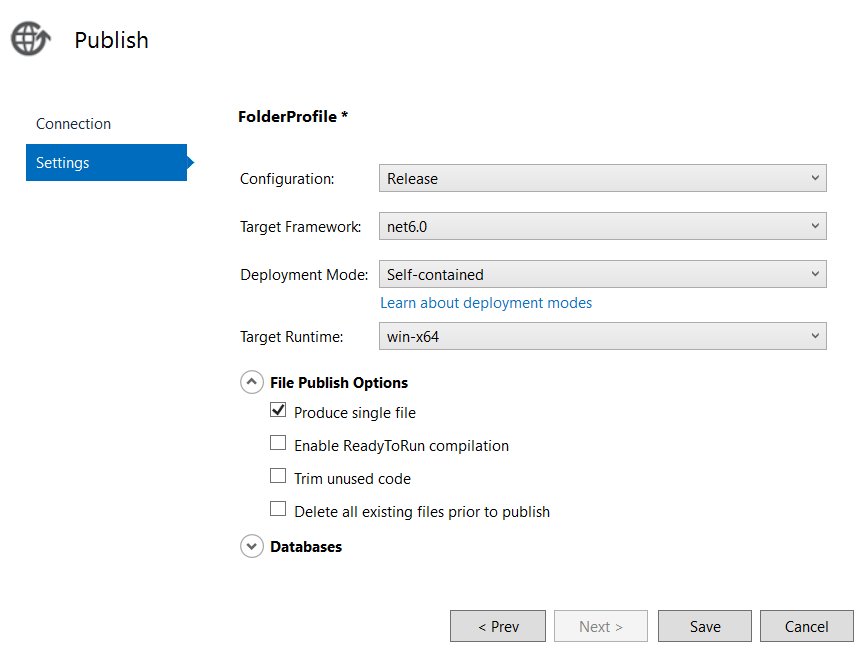
Finally, click the Publish button to start the process.
Have a look in the bin\Release\net6.0 folder and you'll see a huge RetroGamesAPI.exe file, and supporting .NET files.
Creating a subdomain for our API
Hopefully your web host will allow you create subdomains. I'll go the through the motions on a Plesk account, but this process is different from host to host.
Log into your host and create a subdomain under your domain, calling it something like retrogames.
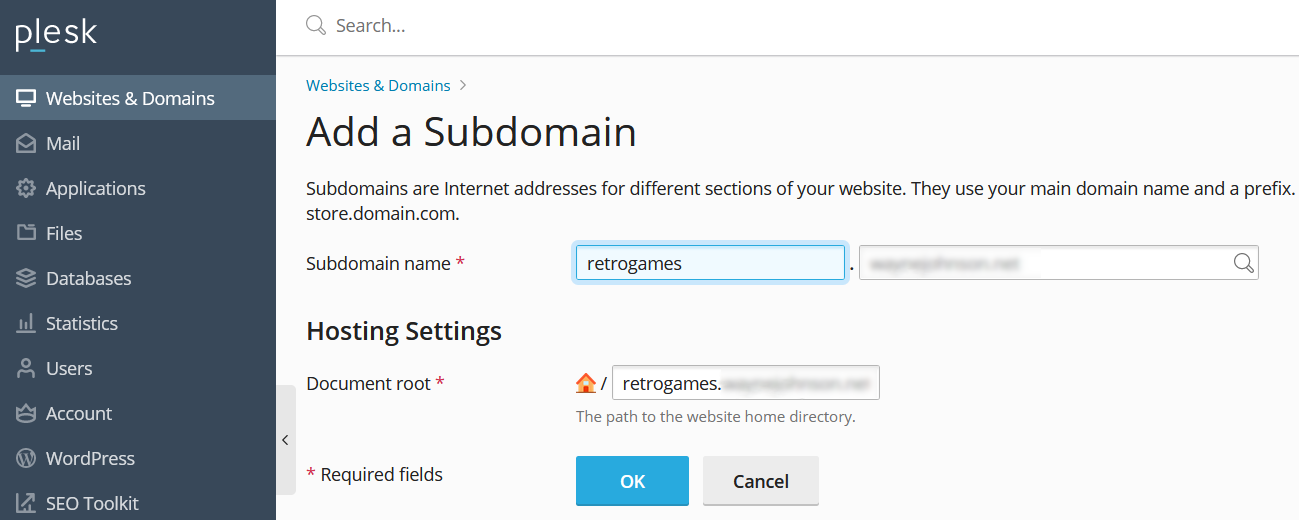
You may have to fix DNS settings using your web host's admin panel to ensure the subdomain is picked up outside for the public.
Go to your File Manager for your subdomain if you have one, so that you can drag and drop your files for upload. If you don't have this, you might have to fall back to using FTP.
Copy your files from the publish folder up to your subdomain folder:
Once uploaded, it's time to try it out:
https://retrogames.somewhere.net/api/games (your domain address of course, this is just an example)
You may encounter this:
HTTP Error 500.38 - Failed to locate ASP.NET Core app
Common solutions to this issue:
The app couldn't be found. Confirm the app's main DLL is present. Single-file deployments are not supported in IIS.

For more information visit: https://go.microsoft.com/fwlink/?LinkID=2028526
Note the “Single-file deployments are not supported in IIS”.
The link for help here is surprisingly helpful! For error 500.38, the recommendation for a Single-file deployment is to:
Switch to the out-of-process hosting model by setting the AspNetCoreHostingModel MSBuild property to OutOfProcess.
We need to switch out from IIS hosting to out-of-process with Kestrel. In order to fix this, right click the project and select “Edit Project File”. Add the following under the <PropertyGroup> node:
<AspNetCoreHostingModel>OutOfProcess</AspNetCoreHostingModel>
<Project Sdk="Microsoft.NET.Sdk.Web">

  <PropertyGroup>
    <TargetFramework>net6.0</TargetFramework>
    <Nullable>enable</Nullable>
    <ImplicitUsings>enable</ImplicitUsings>
	<AspNetCoreHostingModel>OutOfProcess</AspNetCoreHostingModel>
  </PropertyGroup>

</Project>
Republish and re-upload your files and refresh your browser. Your API data should appear! Well done, you've published an API to your own web host.
Consuming the API and CORS
Even though you can browse to it, consuming this API via an application might cause issues due to CORS. An API should have some sort of Authentication mechanism. But in the interum, you can disable CORS in your API's Startup.cs file by adding the UseCors middleware:
            app.UseRouting();

            app.UseAuthorization();

            app.UseCors(b => b.AllowAnyOrigin().AllowAnyHeader().AllowAnyMethod());
Don't forget to remove this if you intend to protect your API. Have fun experimenting with your API on your web host!
RetroGamesAPI available for use online
The full API is actually available for use by your own lab projects and supports both GET and POST endpoints. PUT and DELETE available soon. You are welcome to try it out at:
https://retrogames.waynejohnson.net/api/games
Read how to use it at the Github repo at: https://github.com/sausagejohnson/RetroGamesApi
Any data you create or change will be automatically purged after five minutes. Good luck!
Troubleshooting
If you get a blank page when browsing your api for the first time, try setting a breakpoint. If the breakpoint does hit, check that [Route(“api”)] and [Route(“games”)] are on your controller and endpoint respectively.