This is an old revision of the document!
Table of Contents
Minimum setup for a PIC32MX270F256B on a Breadboard + PICkit3
After discovering that my PIC32MX170F256B did not sport a USB module, I then purchased a PIC32MX270F256B which did have one.
This article serves as a reminder for the minimum setup for this microcontroller.
Wiring up to the breadboard
First, take a look at the Datasheet for the PIC32MX270F256B.
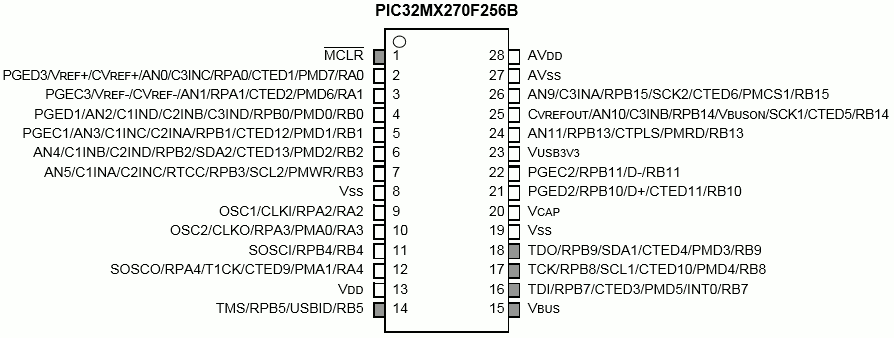
Note the following pins on the Microcontroller:
- Pin 1 is MCLR, and connects to Pin 1 on PICkit3.
- Pins 13 (VDD), 23 (VBUS3V3) and 28 (AVDD) all connect to the Power Rail of the breadboard, and to Pin 2 (VDD) of the PICkit3.
- Pins 8 (VSS), 19 (VSS) and 27 (AVSS) all connect to Ground, and to Pin 3 of the PICkit3.
- Pin 4 (PGED1) connects to Pin 4 (PGD) of the PICkit3.
- Pin 5 (PGEC1) connects to Pin 5 (PGC) of the PICkit3.
- Pin 6 of the PICkit3 remains unconnected.
Next, a couple of LEDs for later testing:
- Pin 2 (RA0) to the positive side of an LED. Negative side of the LED to a 10 Ohm resistor. Then to GND.
- Pin 3 (RA1) to the positive side of an LED. Negative side of the LED to a 10 Ohm resistor. Then to GND.
On both the Power and Ground rails on the breadboard, add a 0.1uf capacitor each.
Also between Pin 20 (CAP) and Pin 9 (VSS) add a 0.01uf capacitor.
Add a 10k pull up? resistor from Pin 1 (MCLR) to Power. MCLR is Master Clear or Reset.
That should be the minimum required to test the Microcontroller.
You can also get a diagram of the recommended setup on page 28 of the PIC32MX270F256B Datasheet, Figure 2-1.
Sensing the chip and programming
Attach a USB cable between the PICkit3 and the computer's USB port.
Load MPLABX IPE and go to Advanced Settings. Choose Family: 32-bit MCUs Choose Device: PIC32MX270F256B Under Power: Ensure 3.3V is chosen. ICSP Options: Check the “Power Target Circuit from Tool” Back in Operate, click on “Read” to see if PICkit3 can find the microcontroller.
The Output should result in:
Programmer to target power is enabled - VDD = 3.300000 volts. Target device PIC32MX270F256B found.
A simple first test is to light an LED from RA1 which is pin 3 on the microcontroller.
In the MPLABX IDE, create a new C project and in the main.c file, add the following before the while loop:
TRISA = 0b00000000; all PortA pins are output PORTA = 0b00000010; set pin 3 (RA1) to on. (supply 3.3 volts)
while(1) { }
A nice simple test. TRISA means all the A pins (RA0, RA1, RA2 etc). Setting each bit to 0 in this way means that every pin will be set as an output pin. This means that voltage can be output from the pin to power something.
PORTA is the way of turning on or off that voltage. So in the above code, only pin 3 (RA1) will be supplied with 3.3 volts. All the other pins will be 0 volts.
As we did earlier on the breadboard, you have a wire from RA1, to a 100Ohm resistor, to an LED and then to ground.
Compile the code. A hex file will be created at:
project\dist\PIC32MX270F256B-cpp\production\myfile.hex
Switch back to the MPLABX IPE and browse for your hex file. Program it to the chip by clicking the Program button.
The LED should light up. Good stuff. Your development flow is complete.
[]
Add flash with internal oscillator
Programming two blinking LEDs
What happens if?
The following shows what happens, or what could happen if part of the minimum set up is not complete. This is only what I have noticed, the effects could be greater for others.
Table of effects
Component For Programming For Execution Not using a pull up on MCLR to Positive No effects Safety to keep a floating pin from random resets on the PIC. 0.1uf bypass capacitors on each side +/- Unstable effects No noticeable effect on basic test External Oscillator Not required Internal can be used No AVDD on Pin 28 PIC can't be found No AVSS on Pin 27 Executes normally No Cap between VCAP on 20 to 21 to GND Executes normally No VDD on Pin 13 Executes normally No VSS on Pin 8 Executes normally No PGEC1 connected Cannot connect to target device No PGED1 connected Cannot connect to target device