This is an old revision of the document!
Table of Contents
Raspberry Pi Pico Setup and Review
Saw the ad for the Raspberry Pi Pico from Core Electronics the other week. I'm not usually one swayed by advertising, that's kind of my thing. But the Pico at $5.75 each, I couldn't pass it up.
And anything Pi usually gets snapped up pretty quick.
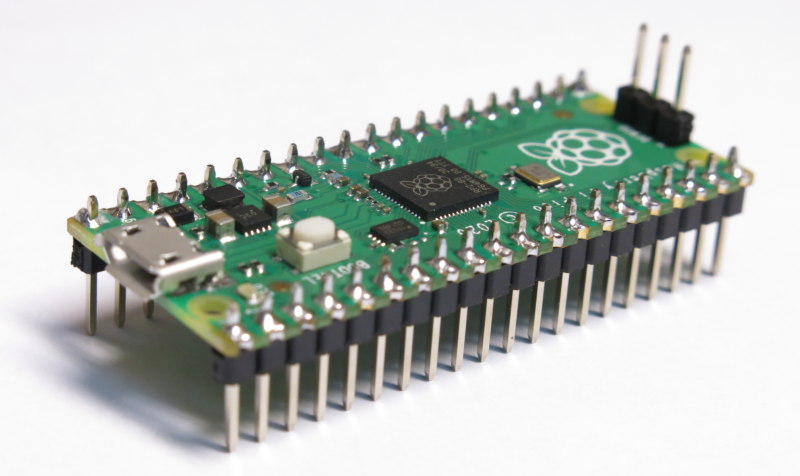
I ordered a couple and they arrived pretty quick in their cool little production cases. I soldered one up and then checked the set up page to see what was required to get it running.
Testing pre-compiled examples
I'll be using Windows, and C++ will be the language of choice for my projects on it.
I followed the official online introduction: https://www.raspberrypi.org/documentation/pico/getting-started/ and on the Getting started with C/C++ tab.
The Pico has an interesting take on how it behaves in contrast to other microcontrollers. When plugging the Pico into a PC via USB, the Pico acts as a USB Mass Storage Device. Much like a USB thumb drive. This is different to many other microcontrollers where the USB connection uses a USB to UART chip to communicate with the board to flash your code.
The space on the device is 128MB.
The instructions mention that you press and hold the BOOTSEL button on the Pico, AND plug into your computer, which is an odd act to perform. But I didn't seem to need to do this.
When simply plugging the unit in I got the mass storage device. I downloaded the test blinky.uf2 file and copied it to the unit. The inbuilt LED starting blinking immediately.
The process was incredibly quick.
Next, I wanted to try the Hello World uf2 file.
Oh interesting! The mass storage device is gone. Perhaps this is where the BOOTSEL button is required? Nope. Unplug and replug? Nope. Ok I'll do exactly as suggested: hold the BOOTSEL while plugging in.
Ok that works. Read the manual, right? Makes sense I suppose. Holding the button while plugging in by-passes the bootup process that executes the code stored there.
Another interesting thing: blinky.uf2 is gone! The system must clean up after itself when the system is started while BOOTSEL is held down.
I dragged and dropped the hello_world.uf2 file onto the Pico. Again, the drive disappeared. I noticed it this time around.
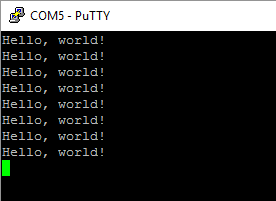
The online instructions are very Linux-centric, however on this occasion (as I'm on Windows) I chose to fire up Putty to check the results.
Now where do I direct Putty? I checked the Device Manager and noticed the USB Serial Device is currently on COM5. Nice.

Directing Serial to COM5 at 115200 baud rate, I got the Hello, World! output.
Setting up C/C++ PC Development
There are two ways to develop C/C++ code on the Pico: either using a PC, or using a Raspberry Pi of all things. This is really cool to be able to have an “all raspberry” branded portable microcontroller development environment.
For me, I'll be following the offical guide at: https://datasheets.raspberrypi.org/pico/getting-started-with-pico.pdf starting from Section 8.2.
There are a number of tools required on your machine. I'll gripe about one: Python is required. But I am not clear as to why. I won't be coding in Python. For C/C++, ARM GCC and CMake are required, so I don't know what part Python plays in the toolchain.
No, wait a second gripe: Visual Studio 2019 C/C++ Build tools are required, which in turn requires Windows SDK and 1.73GB of tools. Not sure where the GNU compiler vs VS2019 compiler come in the scene, but there's a real mix of compilers and tools going on to work with the Pico.
That said, following through the instructions to install the various pieces of software, and getting the two git repos installed was reasonably straight forward. Some of the notes on the Python steps did not seem to apply (or were not available) during the install of Python 3.7.9. So it will be interesting to see if anything trips up when it comes time to compile my own code. (Spoiler: all was fine).
Let's see how we go.
Compiling the Hello World example
This went through without too much of a hitch. I had some initial problems because I forgot to do the nmake step at the end. But overall, the hello_world example compiled ok.
I was a little confused at first as I was expecting a hello_world.uf2, however I ended up a hello_serial.uf2 and a hello_usb.uf2.
But trying both out, hello_usb.uf2 produces the same result as the binary we tried at the beginning of the article. The “Hello World” debug output was available on COM5 (in my case) and checked via Putty.
The hello_serial.uf2 did not produce a COM port. So this is likely used for testing on serial pins.
Compiling Hello World on Visual Studio Code
Writing code under VSCode will definitely be a nicer experience. Unfortunately the guide states that you must start VSCode a special way so that the environment variables load correctly to work with the Pico.
For now, I followed the recommendation to open VSCode via the Visual Studio 2019 Developer Command Prompt.
It should be noted that the build process for the examples in VSCode takes an excruciatingly long time to complete.
After nearly an hour, I ended up killing the virus killer and things picked up a lot more quickly. Still incredibly slow overall.
But I did up with the hello_usb.uf2 file and could install it to the Pico and get output on Putty just like before.
Conclusion
Got to hand it to the folks over at Raspberry Pi. They have made some really nice hardware, great documentation, and an interesting method of uploading code.
I'll be doing a lot more with this device over the coming days.
But it has some rough edges to it. BOOTSEL mode is not a good way for rapid development. You'll wear out your USB port. Section 3.2 of the guide addresses this with the Serial Wire Debug Interface method for uploading code, setting breakpoints, etc, which is pretty exciting.
The other weak point for me under Windows is the concoction of software and compilers needed. I would have hoped there would be no need for Python or the Visual Studio 2019 build tools. Perhaps this might change.
So who is this all aimed at? The simple methods for uploading code is great for young kids to get an easy entry to microcontrollers. And the Micropython support is great for them to have an easy language and environment to set up.
But setting up for C/C++ is finicky, so a little less recommended for the average user interested in C/C++ for this microcontroller.
This is where something like ESP32, ESP8266 (or even Arduino boards) have the edge here with a simple setup using the Arduino IDE.
But it is hard to turn down the pin layout and peripherals of the Pico.
I'll be playing around with this a lot more and watching the tooling with interest.