Table of Contents
Creating a .NET Core application with Entity Framework and SQLite in VSCode
One of the nice things about SQLite databases is that they are so quick to spin up and work with. That's opposed to the overhead of something like SQL Server and it's installation.
Also that SQLite databases can sit comfortably with the application itself for deployments of simple web architectures. There is something simply refreshing about that.
And EF is getting better and easier all the time.
Being able to do all this with .NET Core in a light and flexible IDE like VSCode makes the experience much more pleasant.
Setting up a basic MVC project
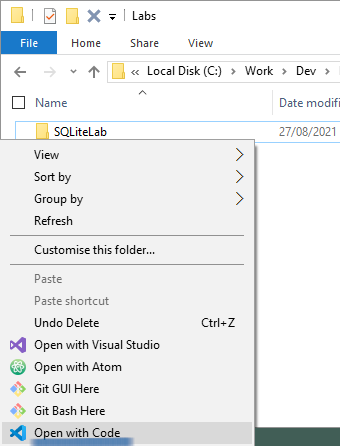
Create a folder called: SQLiteLab
Right click the folder and open with VSCode.
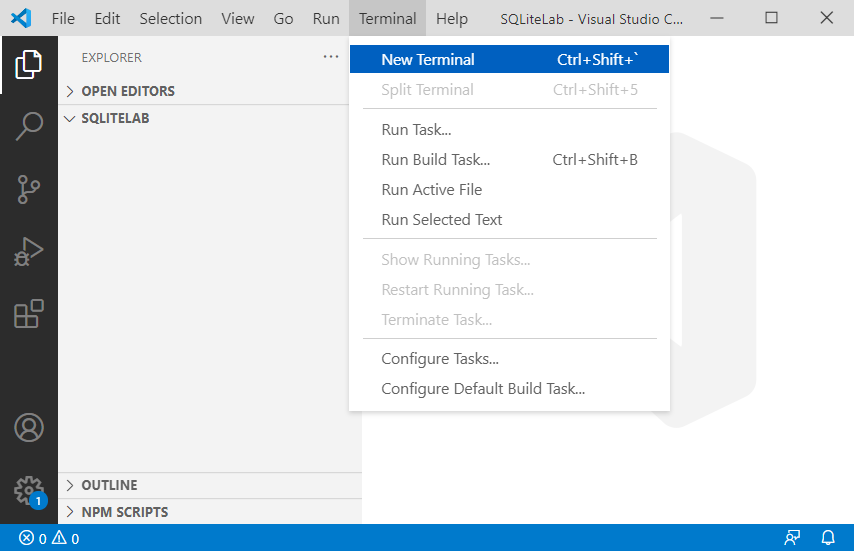
Open the terminal using the terminal menu at the top of VSCode.
Create the project by typing the following into the terminal:
dotnet new mvc
Your project has been created, but cannot be debugged yet without the debug extension being loaded.
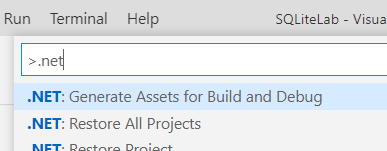
This is per project. You can either restart VSCode and reload your project to trigger the recommended extension. Alternatively, you can trigger this manually by opening the Command Palette and typing .NET. Select the .NET: Generate Assets for Build and Debug option.
Now your project can be easily debugged within VSCode.
Packages
To use Entity Framework and an API to access SQLite, we need the Microsoft.EntityFrameworkCore.Sqlite package.
This can be installed (in my case) for .NET 5 with:
dotnet add package Microsoft.EntityFrameworkCore.Sqlite --version 5.0.9
It will depend on what version of .NET Core you are using. If you are not having luck installing the package, head over to nuget.org:
https://www.nuget.org/packages/Microsoft.EntityFrameworkCore.Sqlite
Select the .NET CLI tab and pick the version that matches your version of .NET Core. This will give you the full command to execute in your VSCode Terminal.
To verify you have the package properly installed into your project, check your SQLiteLab.csproj file. It will contain the following:
<ItemGroup>
  <PackageReference Include="Microsoft.EntityFrameworkCore.Sqlite" Version="5.0.9" />
</ItemGroup>
Models and Tables
Let's design a model. The structure of this model will be used to create a table in the SQLite database. This is called Code First.
Our model will be centred around a GUID and what fun they can be for the entire family.
Create a file in your Models folder called GuidInfo.cs:
using System;
using System.ComponentModel.DataAnnotations;

namespace SQLiteLab.Models {
    public class GuidInfo
    {
        [Key]
        public int gid { get; set; }

        [Required]
        public Guid Guid { get; set; }

        [MaxLength(256)]
        public string Feature { get; set; }
    }
}
This model contains three fields: the ID key, the GUID itself, and a field to describe what is special about this particular GUID. Because all GUIDs are special in their own way.
The DbContext
A class that inherits DbContext can be used as an Entity Framework session to save or query data. We can create instances of our GuidInfo class and save then to our SQLite database. The database doesn't exist yet. But it will soon.
Create the following minimal SqliteDbContext.cs class in the project that inherits the DbContext:
using Microsoft.EntityFrameworkCore;
using SQLiteLab.Models;

namespace SQLiteLab
{
    public class SqliteDbContext : DbContext
    {

        //entities representing tables in the database
        public DbSet<GuidInfo> GuidInfos { get; set; }

		public SqliteDbContext(DbContextOptions<SqliteDbContext> options) : base(options)
        {
        }

        protected override void OnModelCreating(ModelBuilder modelBuilder)
        {
        }
    }
}
Registering both our DbContext and use of SQLite
Add the following using to the Startup.cs file:
using Microsoft.EntityFrameworkCore;
Add the following into ConfigureServices:
    services.AddDbContext<SqliteDbContext>(options =>
        options.UseSqlite(Configuration.GetConnectionString("SQLiteDbConnectionString"))
    );
The above code registers into the DI container that we want to use the SqliteDbContext class for all our database session interactions, and that it will be via SQLite, and that we need the SQLiteDbConnectionString in order to access the database.
SQLiteDbConnectionString doesn't exist yet.
We need to put this string into the appsettings.json file. Add the following config:
  "ConnectionStrings": {
    "SQLiteDbConnectionString": "DataSource=sql-lite-lab.db"
  }
Getting the dotnet-ef tool
It's time to create the database, but in order to be able to do that, we need to add the dotnet-ef tool into our list of available global tools.
To see if you have it already, check your global tools list with:
dotnet tool list --global
If you don't have it, grab it with:
dotnet tool install --global dotnet-ef
Use the list command above again to see dotnet-ef included in your list of global tools.
Producing the database
To make the database, we need to add a “migration” and then perform a database update that will use that migration. So what's a migration? It's either the information to make the whole database the first time, or incremental changes to a database schema. It allows you to change your database schema over time.
To make a migration, you need the Microsoft.EntityFrameworkCore.Design package. Again, use the search at nuget.org to get the correct .NET CLI command to use. In my case, for .NET 5 it was:
dotnet add package Microsoft.EntityFrameworkCore.Design --version 5.0.9
Without the package, attempting to create a migration will yield:
Your startup project 'SQLiteLab' doesn't reference Microsoft.EntityFrameworkCore.Design. This package is required for the Entity Framework Core Tools to work. Ensure your startup project is correct, install the package, and try again.
Now let's create a migration:
dotnet ef migrations add First -o Migrations
You can also undo this action with:
dotnet ef migrations remove
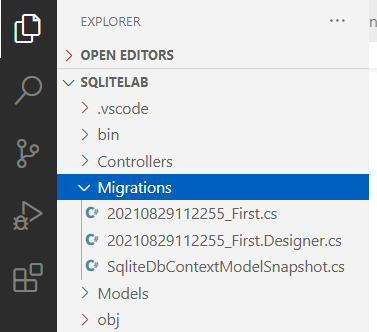
Notice a Migrations folder has been created that contains the code that defines the database and the GuidInfo table.
And now to create the database file itself using the migration file:
dotnet ef database update
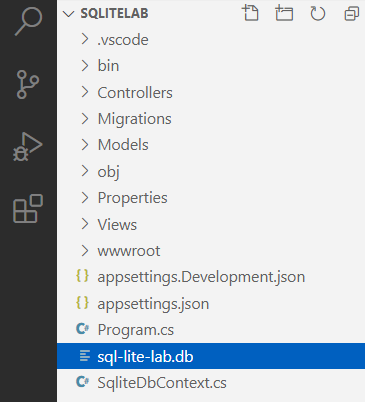
Check the project and notice that the sql-lite-lab.db has been created:
DB Browser for SQLite
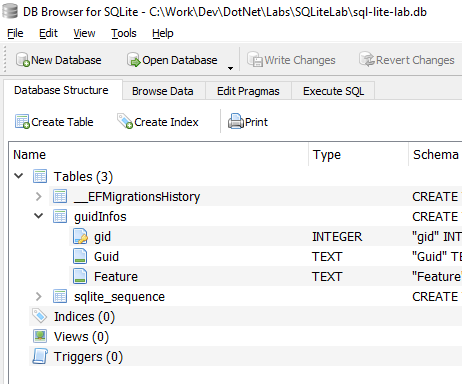
In order to open db files for SQLite, and in particular the one we just made, DB Browser for SQLite is an excellent small tool to use. You can find it for free download at https://sqlitebrowser.org
Once installed, open and browse to the sql-lite-lab.db file. You can see our table created:
Using the DbContext to interact with the Database
Let's use the HomeController to trigger a change in the database. While creating a repository is more appropriate for this, for testing purposes, it will do fine.
Add the using to the HomeController:
using Microsoft.EntityFrameworkCore;
Now to inject an instance of the SqliteDbContext into the controller class. Add a private context variable for use in the controller:
private SqliteDbContext _context;
Update the HomeController constructor to take the injected SqliteDbContext:
	public HomeController(ILogger<HomeController> logger, SqliteDbContext context)
	{
		_logger = logger;
		_context = context;
	}
Create a method to add two records to the GuidInfo table:
private void CreateGuidRecords()
{
    _context.GuidInfos.Add(new GuidInfo {
        Guid = new Guid("D06FACE5-CA6E-D1CE-FAD5-D0661E555555"),
        Feature = "Has dogs, cages, dices and dog faces."
    });

    _context.GuidInfos.Add(new GuidInfo {
        Guid = new Guid("01101101-0110-0001-0111-010001100101"),
        Feature = "MATE in binary. Good to have your mates."
    });

    _context.SaveChanges();
}
Call the CreateGuidRecords method from the Index Action to trigger the two inserts:
    public IActionResult Index()
    {
        CreateGuidRecords();
        return View();
    }
Use the .NET Core Launch which will serve up the application in the browser. This triggers the inserts. Refreshing the GuidInfo table in DB Browser shows our newly inserted data:

That's pretty much enough as far as setting up and getting data into your SQLite .NET Core project. If you want to try a few more things, let's take a look at further migrations.
More Migrations
Now that the application works, we have a database and a context with which to access and change the data. Let's pretend some changes have come through from the team. They want a Likes field added to track how many of the crazy internet kids like those particular GUIDs we have.
First, stop the application from serving by clicking the red stop icon in VSCode.
Add in the new field in the Models/GuidUnfo.cs class like so:
public class GuidInfo
    {
        [Key]
        public int gid { get; set; }

        [Required]
        public Guid Guid { get; set; }

        [MaxLength(256)]
        public string Feature { get; set; }

        public int Likes { get; set; }
    }
Now to create a migration that contains only the changes that have been added to the database since the initial creation:
dotnet ef migrations add Likes-Field -o Migrations
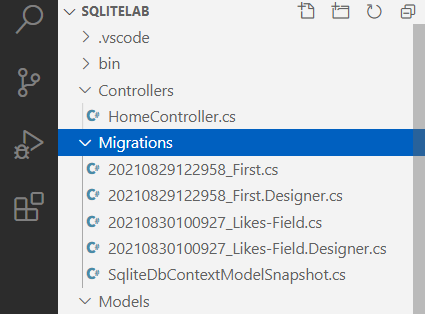
Notice this creates a second migration into the Migrations folder of the project:
If you open the non-design file, you will see only the addition of a Likes field. Very cool. Apply the incremental change to the actual database again using:
dotnet ef database update
If you take a look in the DB Browser, you'll see the new Likes field has been added, and our two records are preserved. We have 0 likes on both GUIDs. Which is a shame.
That's it for now. Have fun with SQLite!